

Building a WAMP Stack for Web Development
What is a WAMP stack?
WAMP is an acronym for W(indows) A(pache) M(ySQL) P(hp). This is a personal server configuration for those of us that want to develop web applications locally (on your own machine) before handing them off to a potentially better managed web server hosting company, like DreamHost. Although most companies allow you to “practice” building your site on their servers (they’re charging you anyway, so why not?), in order to make sure your application runs as close to expected as possible, most people choose to build locally, then copy the files to their web server. This helps to keep the errors on the live site to a bare minimum, since it allows us to catch and squash bugs before they are seen by the public, and that helps us look as professional as possible, especially for those that are freelancing, or trying to build a portfolio for future employment prospects.
Why is a WAMP stack necessary? Well, it’s not 100% necessary, but it includes most of what you’ll need to get your feet wet in web development. Aside from the “W” in WAMP (which stands for Windows, but that can change based on your operating system. More on that in a bit.), the stack includes Apache, which acts as a web server allowing your computer or workstation to serve html, php and most other formats to a web browser, MySQL which is a database management system that allows you to access data from a MySQL database and display data stored in a MySQL database to your web pages, and finally PHP, the foundational framework that you’ll be using to create those dynamic pages.
Each of these applications have their own “learning curve”, and it is my hope that I’ll be able to expand on them in future posts, but before you can really look into learning them, you have to get started somewhere, and installing them is always the first step.
How to Install it?
The first step to creating your WAMP stack is installing the necessary programs. Now, you could install them all individually, but for the moment, let’s install them as a package group, since installing them separately would require a lot of set-up on your specific machine, and each install would have it’s own issues. Let’s not complicate things too much yet. We want to keep things at a learnable pace, and one of the things that causes people to give-up on things is when it gets too complicated.
Here are the basic steps to start on you WAMP journey:
- Go to ApacheFriends.org and download the appropriate XAMPP build for your OS.
- Once downloaded, launch the installer and follow the directions within the installer. It is important to not that on Windows it’s usually best to install within the base “C:” drive instead of the “C:/Program Files” folders, due to some permissions conflicts that may happen when installing. Don’t sweat this step though, because during the installation, XAMPP will let you know.
- When the installation is complete, XAMPP will open your browser and display the XAMPP “documentation” page. If you look up in the address bar of your browser, you should notice either “localhost/dashboard”, or “127.0.0.1/dashboard”. If you see this, the install was good and you now have a WAMP installation. If you don’t see this, and you get an error, the best place to troubleshoot your error is on the XAMPP forums. As someone who has installed everything from ColdFusion to MSSQL on my local machine, I’ve run into some errors and the forums have always helped me solve the problem.
On a side note: Get used to looking through forums, and understand how to problem solve using them. Most of the time you won’t get the one, absolute way to solve your issue, but you may find that it takes a few steps to solve it. This will not only help you with your WAMP install, but you’ll be looking through them for PHP advice, MySQL advice and tons of other computer related topics. Rather than looking at it as a huge problem and giving up, view it as a puzzle that you have to put together, and once you solve it, pat yourself on the back and have some celebratory ice cream.
Once XAMPP is installed, you’ll notice that you can run Apache (webserver) and MySQL (database) from a single control panel, usually located in the taskbar of your OS. Once clicked, you should see something like this:
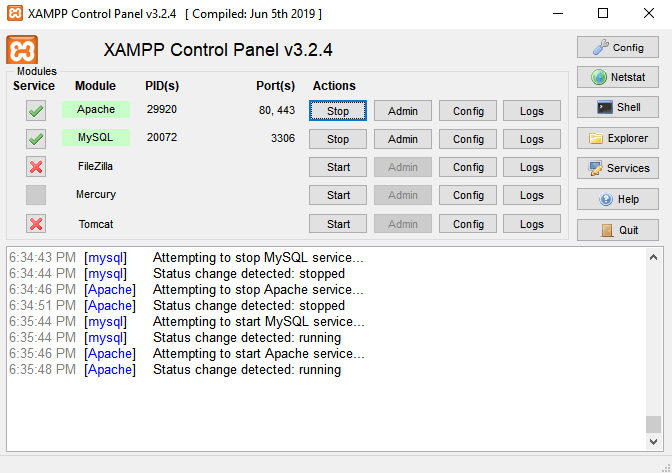
From here, you can access the control panels for most of your WAMP. I don’t have Filezilla, Mercury or Tomcat turned on because I don’t need to have FTP (Filezilla), Mail (Tomcat) or Java (Mercury) on at the moment, and for now, let’s just leave them off.
I would suggest though to temporarily turn off Apache and MySQL, and change the “Modules Service” from the “X” to the checkmark. This installs several of the necessary modules that we’ll be using for our WAMP stack.
Once those are installed, remember to restart the apache and MySQL processes. Again, if you run into any issues restarting them, check the XAMPP forums. I ran into an issue where the port used for Apache was being used by another program, and refused to start. I found that program, turned it off and Apache started perfectly.
Now, before we get into how everything with the admin area functions, there’s some important information you should know ahead of time. All of your HTML (HyperText Markup Language) and your PHP files are currently located in “C:/xampp/htdocs/”. The files are the files that will make up your website, and should only be located here. Anything other than .php or .html (aside from graphics) should not be placed in this folder, since they would technically be exposed to the public if you copied this folder to an actual web server. Writing a “How to” on basic html is in my to do list, but for right now, only .html, .php and graphics should go in that folder.
If you open your “C:/xampp/htdocs/” folder (I’m going to start using the term “root folder” since you’ll hear it called that more times than not), you’ll notice several other folders, but the main thing you should notice is the “index.php” file. It’s that file that is being displayed to your web browser, and you’ll find that for now, anytime you want to show a page in your browser, the first page displayed will be index.php, even though you don’t see “index.php” at the end of the website address.